While I qualified a long time ago on the M9, I never really learned to be a good shot. Now, I’m trying to learn to shoot well and wanted to automatically score my targets, keep the data, and get better.
There are apps to do this, but none of them did what I wanted. One app by Thomas Gabrowski and Justa Mili works off a photo of the target to automatically calculate the score. They also have the capability to analyze shooting groups with Windage, Elevation, Mean Radius and Extreme Spread. They have capabilities to keep track of your previous shooting sessions and monitor progress. The App costs $17.
Developing my own costs my time, but gives me flexibility to work with my targets and my system. It’s also a thing I do: grab challenges that will teach me something. It’s served me well and Matlab makes this all accessible and fun. The other thing is that apps never work exactly right. What if I want the raw data so I can calculate if I’m aiming high or low over time? All this code is on github at https://github.com/tbbooher/automatic_target_scoring.
I told my children that two key skills every digital citizen needs are the ability to process text and images. By processing text, I’m able to tell any story from any reports in digital form. This is often bank statements, hotel stays, fitness stuff or uber rides. By processing images, I’m able to understand and report on things that are happening around me.
In looking around, I found this thesis filled with some good ideas. I reached out to the author and discussed the merits of edge detection vs template matching. He didn’t have his code available. There were several papers but none were really that helpful. It was easier to start building than to spend a lot of time reading other’s approaches.
I knew there would be three steps to this: (1) registering all images to the standard, fixed, image for consistent distance, (2) finding the bullet holes/center and (3) measuring the distances from the center each hole.
Image Registration
This was harder than I thought since most registration is for two similar images. I was used to the ease of Photoshop for rapid registration. It turns out it is a hard problem to register images of different pictures of what are really different scenes, even though the structure is common. Most image registration problems are pictures of the same scene that have been taken at different angles or distances. The picture below makes this clear:
Reference and Real Image
I found two approaches that worked for image registration. The first approach was to extract the red circle and then make the circles match. Here I had to calculate and align the centers, and rescale one image to the size of the other. Color thresholding and imfindcircle were quite useful.
For the more general case, I had to use fitgeotrans which takes the pairs of control points, movingPoints and fixedPoints, and uses them to infer the geometric transformation. It does this by taking the pairs of control points, movingPoints and fixedPoints, and uses them to infer the geometric transformation. After doing this I had a set of images that were all the same size, and all in the same orientation — with bullet holes.
Registered Images
Finding the bullet holes
I was able to use this matlab post to learn that I could sample some colors in photoshop, convert the image to HSV and find shades of gray using some code from Theodoros Giannakopoulos.
The next thing I had to do was create the ability to find the center. I did this by recognizing that the center X is red and pretty distinctive — ideal for template matching using normalized cross-correlation matlab has a great description of how this works here. With this accomplished, I can find the center in a few lines, by going off this template:
Template
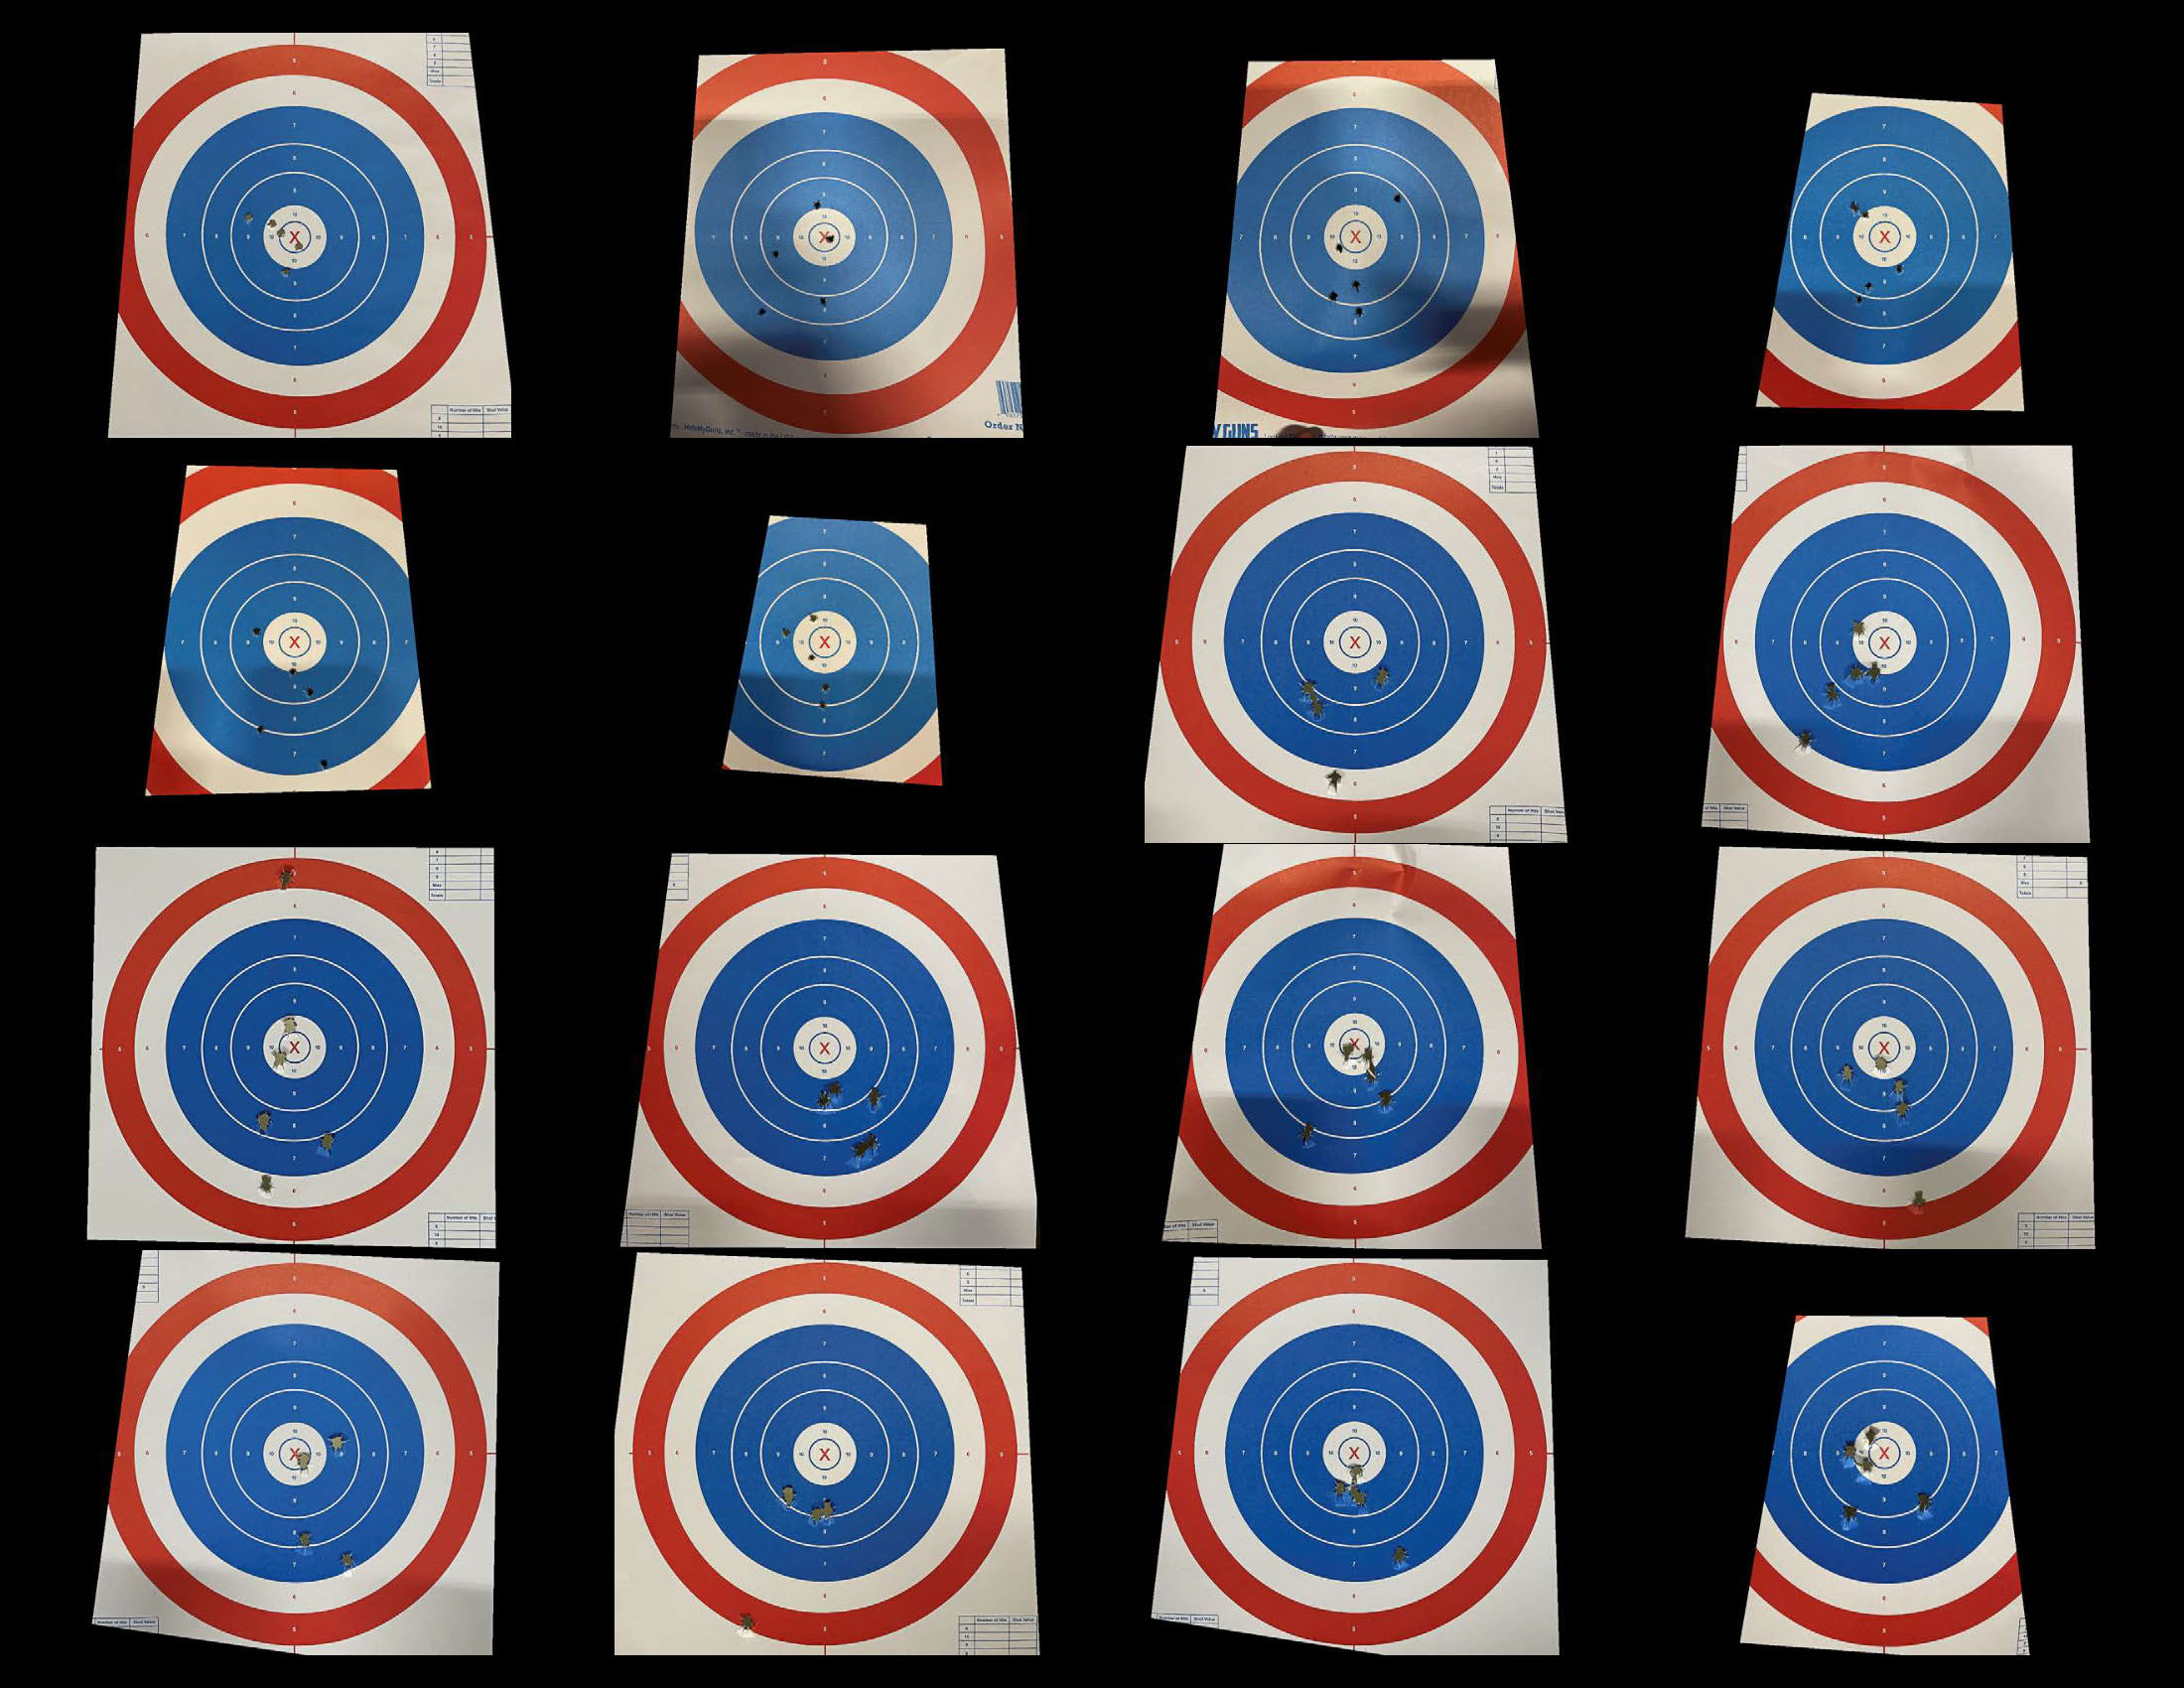
All together, I’m able to compute the measurements to make a picture like this (note the green circle in the middle on the X):
Result
With the image registered, the center defined and all holes discovered, I could easily calculate a score of a mean distance to the bullseye.
Problems
The problem was that I couldn’t get good consistency. The shadows were a problem on some images, on others, shots very close to one another caused confusion. It turned out that I was really good at quickly seeing the holes, better than a template matching problem. Note that when I saved the image, I updated a xls file and saved the scores as EXIF data so the image had the exact locations of the holes that I could pull out later if needed. The code below works awesome and is ideal for my solution. Best of all, I learned a lot about how to manipulate and extract data from images.
Results
So, is my shooting getting better? Not yet. In the plot below you can see my score is increasing, and the stDev of my shots is increasing as well. Now, the data aren’t uniform since I had the target at 5m and now have it at 6.5m on Oct 8. Sept 12 was with a suppressed 22 at 5m. Oct 8 was 9mm. Anyway, it’s better to know from data than to be guessing. I’m chalking this up to an improved technique that is taking some time to adjust to.
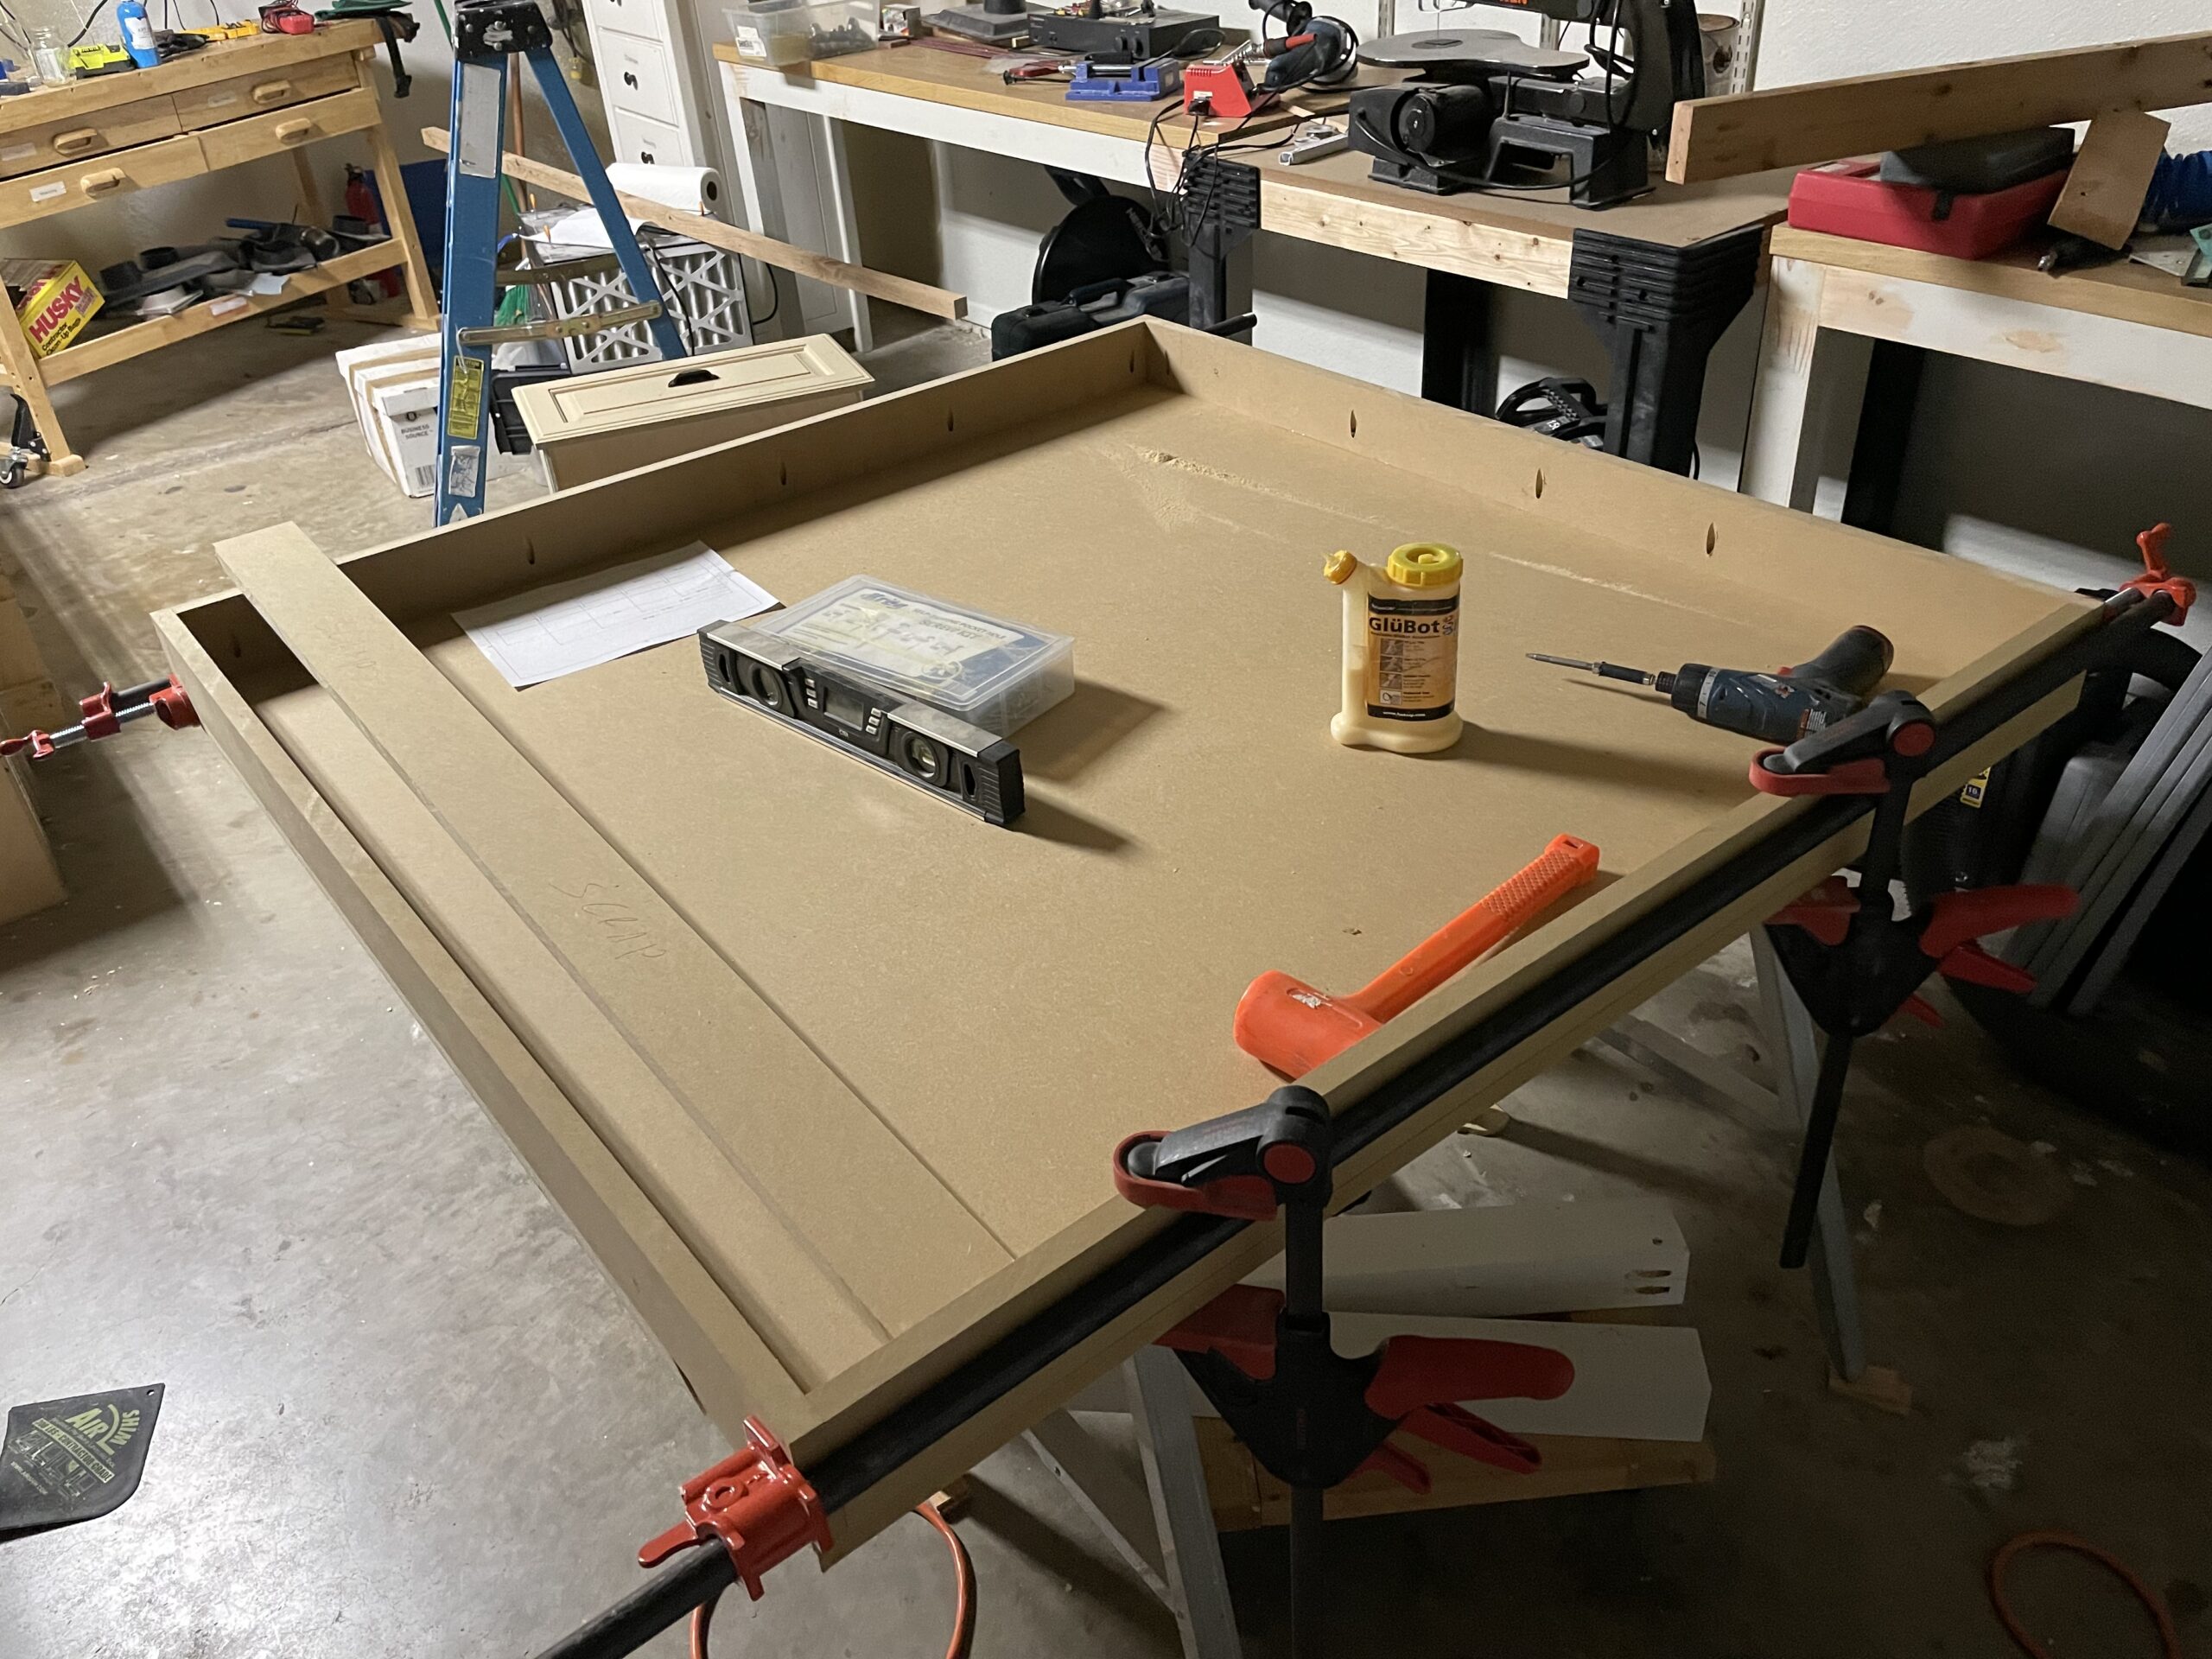
I needed a torsion table to make sure my Shapeoko XXL had a solid foundation. Dimensions for the Shapeoko are available here. The basic idea of a torsion table is to use two thin layers of material on either side of a lightweight core, usually a grid of beams. Torsion boxes are used in wings and vertical stabilizers. The final product can resist torsion under an applied load. The torsion box uses the properties of its thin surfaces to carry the imposed loads primarily through tension while the close proximity of the enclosed core material compensates for the tendency of the opposite side to buckle under compression.
Marc Spagnuolo, a.k.a. “The Wood Whisperer,” put together a pretty comprehensive 20-minute-plus video on how he built his. Spagnuolo shows you how to get past the dilemma of building your first torsion box, which is: how do you construct a perfectly flat surface, before you’ve got a perfectly flat surface to assemble it on?
My design was intended to look similar to this, but I didn’t like the idea of making sure all the individual pieces were straight, so I build a design based on half-lap joints.
Example Build
Lining everything up perfectly was super easy after cutting the slots. MDF is an amazing material.
My end design looked like this (I always use mm for dimensions).
I used my table saw to cut down the core pieces all to the same height. A torsion box is a completely flat, very sturdy and relatively lightweight surface, and anyone designing anything structural and rectilinear should understand its principles. The concept is simple, even if construction can be tedious: Two flat, horizontal surfaces are sandwiched over a grid of crossmembers, and once the sandwich is glued shut, a rigidity much greater than that possessed by the individual parts is achieved.
Pieces Cut
I added shims to the bottom of the saw horses to make sure the base was level. I used lots of glue.
Assembly drying
By using half-lap cuts I was able to get all the spacing right. It was critical to square the boards.
Half-laps cut
Here you can see my use of pocket screws and my testing of the table to ensure it is level.
Inital design
I love using cutlist optimizer to speed up my cuts and optimize the use of the wood. I’ve designed cutting algorithms myself in the past and this online tool is fast, accurate and excellent. (https://www.cutlistoptimizer.com/). I did make a design change by ripping long strips so I could avoid the inaccuracy of all the small cuts.
Cutlist
I made a video of my design process. I made a component with half-laps cut out, replicated it with design tools, flipped a copy that I rotated 90 degrees.
Kerf Mount Corner Brackets are great. But it takes some thinking if you are working with larger lumber. I recently purchased these and these from amazon.
The corner bracket looks like this:
The trick is figuring out where to cut the leg at 45 degrees and the kerfs, especially if the leg isn’t square. I was going to work out the geometry of this, but instead I measured the bracket, drew a horizontal profile in visio and then measured the geometry. Since the leg isn’t square, I had to decide where the bracket mounts flush. I included my drawing here in the hopes that it may be helpful to you.
“If love is the essence and totality of the good demanded of us, how can it be known that we love?”
Karl Barth
We think in groups and live in tribes. It’s hard to believe anything that doesn’t align with a big group of folks. The historical struggle between economic classes is shifting to a conflict between specific identity groups. This is a consequence of the failure of Marxism in practice. I’ve been given a front-row seat to observe that the power in our culture is increasingly concentrated into a few geographic regions that control business, marketing and media. Old ideas are recycled into weapons to gain political power as new groups align to seek their own self-interest. This leaves a lot of us confused as we try to live authentic and peaceful lives in light of constantly changing goalposts.
One way to view history is by teasing out the changes in hopes and fears. All people are constantly trying to be safe and in control of their lives, and some people (generally the *elite* which has been everything from the church to the secular left) are always trying to control others. It is a modern activity to leverage technology and the marketplace of ideas as a means to power. Since the 15th century, Europe has been the source of radical transformation. The shift from pre-Modernity to Modernity ushered in an era of constant change starting with the Italian Renaissance, followed by the growth of Humanism and the Reformation movement. The colonization of the East and the Americas, the Enlightenment, the French Revolution, new nationalistic states and the Industrial Revolution made all this spin faster. However, nothing accelerated things more than technology and the ability to record and share scientific knowledge. (cf Karl Barth, Die Protestantische Theologie im 19. Jahrhundert)
Things looked rosy for America and the West at the start of the 20th century. Scientists performed Miracles. Automobiles, modern factories, new medicines and aircraft gave the news a constant stream of novel wonders to share. Western countries were confident of their superiority as they reached the zenith of their political and economic power. This was coincident with an age where many theologians were optimistically convinced of man’s natural ability to know God and speak about God. They believed theology needed to be as “scientific” as all the other sciences. They were convinced that it would be possible to speak about God in scientific terms, based on the innate qualities of humanity. Human reason, experience, morality and history became the foundation of religious discourse. There were no doubts about our ability to improve and reshape society with the aid of scientific knowledge. Scientists were convinced that unlimited progress would create a better and brighter future for all people. Dreamers were in vogue reading novels such as Jules Verne’s, From the Earth to the Moon (De la terre à la lune), — the story of the Baltimore Gun Club and their attempts to build an enormous space gun which could launch the club’s president and a French poet to the moon.
Onward!
World War I changed everything. Optimism was replaced by fear, and by the knowledge that science and technology not only facilitated the progress and well-being of humanity, but also the devastation of society and the destruction of humanity. This realization caused a major crisis in European society.
It was this crisis that led to our current discussion of critical race theory, which is an offshoot of critical theories that trace back to intellectuals, academics, and political dissidents dissatisfied with the contemporary socio-economic systems (capitalist, fascist, communist) of the 1930s. The Frankfurt School was an ideological consolation prize for the Marxists of the failed German Revolution of 1918-19, in the same way that Woke Progressivism was a consolation prize for those of the failed Revolution of ‘68. It was originally located at the Institute for Social Research (Institut für Sozialforschung), an attached institute at the Goethe University in Frankfurt, Germany. The Institute was founded in 1923 thanks to a donation by Felix Weil with the aim of developing Marxist studies in Germany. After 1933, the Nazis forced its closure, and the Institute was moved to the United States where it found hospitality at Columbia University in New York City. The Frankfurt theorists proposed that social theory was inadequate for explaining the turbulent political factionalism and reactionary politics that arose from 20th century liberal capitalist societies. Criticism of capitalism and of Marxism–Leninism as philosophically inflexible systems of social organization, the School’s critical theory research indicated alternative paths to realizing the social development of a society and a nation.
The academic influence of the critical method is far reaching. Some of the key issues and philosophical preoccupations of the School involve the critique of modernity and capitalist society, the definition of social emancipation, as well as the detection of the pathologies of society.
The legacy of the Frankfurt School is Critical Theory, which is a full-fledged philosophical and sociological movement spread across many universities around the world. Critical Theory provides a specific interpretation of Marxist philosophy with regards to some of its central economic and political notions like commodification, reification, fetishization and critique of mass culture. Marxism led to the Frankfurt School, which led to Critical Theory, followed by Critical Legal Studies, and finally Critical Race Theory. The end result today of all this in the public square is a post-modern struggle between culture and races that emphasizes lived experience over liberal argumentation and truth discovery. When people often talk past each other, they are failing to realize that they operate in wholly different truth systems.
Dudes with Ideas
In emphasizing lived experience over other sources of truth such as science and reason, everything is viewed as a racial power struggle. Philosophically, we trade Kant’s logical system for Foucault’s rejection of the knowability of anything. Marx’s fervent calls for bloody class warfare are replaced with an equally fervent focus on inter-racial dynamics as CRT assumes a priori that racism is present in everything under a doctrine known as “systemic racism.”
Karl Barth thinking and writing
Enter Karl Barth (1886-1968), the local pastor of the small industrial town of Safenwil in the Swiss canton of Aargau. A fascinating fellow, he is no evangelical, but is the father of neo-orthodoxy and crisis theology. He addressed critical theory with a focus on the sinfulness of humanity, God’s absolute transcendence, and the human inability to know God except through revelation. The critical nature of his theology came to be known as “dialectical theology,” or “the theology of crisis.” This initiated a trend toward neo-orthodoxy in Protestant theology. The neo-orthodoxy of Karl Barth reacted strongly against liberal Protestant neglect of historical revelation. He wanted to lead theology away from the influence of modern religious philosophy, with its emphasis on feeling and humanism, and back to the principles of the Reformation and the teachings of the Bible.
Karl Barth presciently used the modern language of Wokeness in his defense of orthodoxy. He defined the entire life of Christian discipleship as people who are continually reawakened – continuous repentance, continuous transformation, continuous renewal. Barth was careful to say that Christians aren’t the people who are awake vs. everybody else who’s asleep. Christians are those who constantly stand in need of reawakening from the sleep of all kinds of errors and “fantasies and falsehoods.” To Barth, we have to be on guard so we don’t fall asleep to what’s true, and what’s coming to us in Jesus’ way of love and peace.
Barth departed from evangelicals in his view that the Bible not as the actual revelation of God but as only the record of that revelation. To Barth, God’s single revelation occurred in Jesus Christ. In short, Barth rejected two main lines of interest in Protestant theology of that time: historical criticism of the Bible and attempt to find justification for religious experience from philosophy and other sources. Barth saw in historical criticism great value on its own level, but it often led Christians to lessen the significance of the testimony of the apostolic community to Jesus as being based on faith and not on history. Theology that uses philosophy is always on the defensive and more anxious to accommodate the Christian faith to others than to pay attention to what the Bible really says.
“The person who knows only his side of the argument knows little of that.” — Karl Barth
Barth stays out of the evangelical camp due to his view of the individual’s role in scriptural interpretation. John Calvin, by contrast, emphasizes the inspiration of Scripture, the text itself being God-breathed, regardless of whether or how believers receive it. Barth prefers to speak of the out-breathing of the Spirit of God in both the text and the believer, thus distancing himself both from the exegesis of Scripture and from the Reformed tradition.
However, Barth is a bold defender of the rights of the individual and for the goodness of self-criticism. One of my favorite Barth stories tells of a letter he received which said Professor Barth, I have discovered the following contradictions in your writings, what do you say about these contradictions? And Barth ostensibly wrote back and said: Well, here are some others. And lists a few more contradictions. Yours faithfully . . . This is a powerful statement of the liberal idea of welcoming self-criticism.
This is why I find such joy in revisiting Karl Barth. He passes my “coffee test” where I know I would enjoy a sit-down with him. He combines love and grace with an intense pursuit of the truth and then dares to think original thoughts. The fact he doesn’t fit in my American Evangelical tribe is a welcome bonus. I’m pretty sure everything I believe is wrong in some way. Both my orthodox theology, my teleology and my scientific worldview compel me to admit that every tenant I hold should be tested and improved. This is why I love voices that start with grace and end with brilliance. I’m open to change and hunger to learn, but skeptical of political agendas. I’m aware that history is the story of power politics. Oppression is real, but doesn’t belong to one identity. Insight and wisdom are real, but don’t belong to one group. He shares that we are all equally guilty, and equally deserving of grace. Karl Barth preached, wrote and shared his wisdom by inviting others to learn. He and I share the same loves (wisdom, Jesus, learning and talking) and many of the same convictions (that grace and redemption are real, possible and freely available). I’m glad he took to the time to share his thoughts as they are a great comfort in times such as these.
Testing HTTPs locally is always hard, but I’m against testing on production or even on a remote server.
Things are also complicated by developing in linux as a subsystem on windows via WSL2. I was able to use mkcert to get ssl to work locally.
While I would love to use Let’s Encrypt locally, Let’s Encrypt can’t provide certificates for “localhost” because nobody uniquely owns it. Because of this, they recommend you generate your own certificate, either self-signed or signed by a local root, and trust it in your operating system’s trust store. Then use that certificate in your local web server. They describe this well on their website.
Using certificates from real certificate authorities (CAs) for development can be dangerous or impossible (for hosts like example.test, localhost or 127.0.0.1), but self-signed certificates cause trust errors. Managing my own CA may be the best solution, but mkcert automatically creates and installs a local CA in the system root store, and generates locally-trusted certificates. I was able to modify my nginx.conf with the my container test environment and open the necessary ports in docker-compose (- 443:443) to get this working just fine.
You can see my working code here on a new git branch.
I have to build and interact with things to understand them. At MIT, we focused on combination of thought and practical action to solve current and future problems and our motto (mens et manus) combines application (hand) and theory (mind).
By day, I’m leading adoption of containers and automation technologies to drive big changes in enabling software reusability. By night, I’m using containers to teach me new programming languages, interfaces and networking concepts. Last week, I wanted to learn how reverse proxies work and wanted to use containers and some familiar technology express, flask, nginx and docker to help me.
First, I’m sharing this because I wish this existed out there to learn from, so please head to gitlab https://gitlab.com/tim284/nginx_proxy_test and clone this and let me know if you do anything awesome with it.
Because I like Plutarch in general and studying the Battle of Thermopylae in particular, you will notice a theme. (Please, the movie is all cool, but nothing close to reading the Gates of Fire.)
Containers
Containers are a solution to the problem of how to get software to run reliably when moved from one computing environment to another. The basic idea is to have the complexity and overhead that you want. Instead of using a full operating system in a virtual machine, you can use the bits you want and need. A container consists of an entire runtime environment: an application, plus all its dependencies, libraries and other binaries, and configuration files needed to run it, bundled into one package. By containerizing the application platform and its dependencies, differences in OS distributions and underlying infrastructure are abstracted away.
Architecture
I created two express applications, one Flask and one static site. I run the active apps in containers and use nginx reverse proxy to present them. The static HTML page connects through a docker volume. Free Code Camp wrote a nice tutorial that explains this type of setup.
One of the key concepts I had to learn was how networking works in Docker. This seemed like a right of passage I needed to know to work with containers in general. This article helped me a lot.
Docker
Complexity continues to increase with continuous new introduction of new programming languages, hardware, architectures, frameworks, and discontinuous interfaces between tools for each lifecycle stage. Containers allow you to focus on what you are building and quickly adapt new technology. Most important, I can quickly change and reuse things to learn a lot quickly. It can be hard to remain a full stack developer, a dad and a business leader. Docker simplifies a lot of things I don’t have time to learn and accelerates my workflow to allow me to experiment and innovate with different tools, application stacks, and deployment environments.
For this experiment, I use docker-compose to pull in images of nginx, flask, express and the redis database.
NGINX
Nginx is a popular web server (23.21% of sites) that can also be used as a reverse proxy, load balancer, mail proxy and HTTP cache. The software was created by Igor Sysoev and publicly released in 2004. A company of the same name was founded in 2011 to provide support and Nginx Plus paid software. In March 2019, the company was acquired by F5 Networks for $670 million. What a crazy startup idea: take an open source project, improve and support it and start a company (github, Nginx, etc).
Nginx is built to handle many concurrent connections at the same time. It can handle more than 10,000 simultaneous connections with a low memory footprint (~2.5 MB per 10k inactive HTTP keep-alive connections). This makes it ideal for being the point-of-contact for clients. The server can pass requests to any number of backend servers to handle the bulk of the work, which spreads the load across your infrastructure. This design also provides you with flexibility in easily adding backend servers or taking them down as needed for maintenance.
Another instance where an http proxy might be useful is when using an application servers that might not be built to handle requests directly from clients in production environments. Many frameworks include web servers, but most of them are not as robust as servers designed for high performance like Nginx. Putting Nginx in front of these servers can lead to a better experience for users and increased security. This post from Digital Ocean is awesome at explaining all of this.
Reverse Proxy
A proxy means that information is going through a third party, before getting to the location. Why use it? For example, if you don’t want a service to know your IP, you can use a proxy. A proxy is a server that has been set up specifically for this purpose. If the proxy server you are using is located in, for example, Amsterdam, the IP that will be shown to the outside world is the IP from the server in Amsterdam. The only ones who will know your IP are the ones in control of the proxy server.
Proxying in Nginx is accomplished by manipulating a request aimed at the Nginx server and passing it to other servers for the actual processing. The result of the request is passed back to Nginx, which then relays the information to the client. The other servers in this instance can be remote machines, local servers, or even other virtual servers defined within Nginx. The servers that Nginx proxies requests to are known as upstream servers.
A reverse proxy, by contrast, will not mask outgoing connections (you accessing a webserver), it will mask the incoming connections (people accessing your webserver). You simply provide a URL like example.com, and whenever people access that URL, your reverse proxy will take care of where that request goes.
Here I’m using a reverse proxy so I can have services running on a several ports, but I only expose ports 80 and 443, HTTP and HTTPS respectively. All requests will be coming into my network on those two ports, and the reverse proxy will take care of the rest.
Nginx can proxy requests to servers that communicate using the http(s), FastCGI, SCGI, and uwsgi, or memcached protocols through separate sets of directives for each type of proxy. The Nginx instance is responsible for passing on the request and massaging any message components into a format that the upstream server can understand.
My Nginx config below allowed me to proxy_pass to the upstream servers that Docker created.
First, I need some apps to serve content and in order to make sure I’m understanding how to proxy to different services, I use both JavaScript (Express) and Python (Flask).
Express
Express.js, or simply Express, is a back end web application framework for Node.js, released as free and open-source software under the MIT License. It is designed for building web applications and APIs. It has been called the de facto standard server framework for Node.js. I like it because I can create a web application in several lines.
Flask App
Flask is the most minimal python web application framework. My app is bare-bones simple and just returns some basic text.
Static Page
In order to test the most basic feature of nginx, I build a static page.
Results
First I want to see all of my containers running:
➜  proxy_test git:(master) ✗ docker ps
CONTAINER ID   IMAGE                 COMMAND                  CREATED         STATUS         PORTS                                         NAMES
ac83546944da   nginx                 "/docker-entrypoint.…"   5 minutes ago   Up 5 minutes   0.0.0.0:80->80/tcp, :::80->80/tcp             proxy_test_webserver_1
36d93cfe4a41   proxy_test_flask      "/bin/sh -c 'python …"   7 hours ago     Up 7 hours     0.0.0.0:5000->5000/tcp, :::5000->5000/tcp     proxy_test_flask_1
30f29133b42a   proxy_test_lochagus   "docker-entrypoint.s…"   7 hours ago     Up 7 hours     0.0.0.0:49160->8080/tcp, :::49160->8080/tcp   proxy_test_lochagus_1
0d1a98a27730   proxy_test_leonidas   "docker-entrypoint.s…"   7 hours ago     Up 7 hours     0.0.0.0:49161->8080/tcp, :::49161->8080/tcp   proxy_test_leonidas_1
4770b2726dfd   redis                 "docker-entrypoint.s…"   7 hours ago     Up 7 hours     6379/tcp                                      proxy_test_redis_1
and, does it work? curl -i localhost produces my static page. but most important, curl -i localhost/flask produces dynamic content.
HTTP/1.1 200 OK
Server: nginx/1.21.0
Date: Sun, 06 Jun 2021 10:09:03 GMT
Content-Type: text/html; charset=utf-8
Content-Length: 51
Connection: keep-alive

This Compose/Flask demo has been viewed 23 time(s).%
Next Steps
This is just the beginning. Next, I’m going to use gitlab to deploy all of this let’s encrypt to secure all of the traffic and more.
Lauren was disappointed when we had to take 30" away from her already small room to build a bench for a duct after adding a furnace to the third floor.
Lauren did an initial sketch of what she wanted to build. Her overall goal was to maximize the space available in a smaller room. This meant we needed lots of storage and that we wanted to use the surface area of the bed.
We looked around for some design ideas. We decided to match the trim color of the room and use the bottom for storage.
I drew this up in Sketchup and decided on a design that used pine 2×4 and 2×6 to make the frame, with poplar sides. By using an internal frame and a several stage layup, we could make lots of adjustments.
We decided on three drawers on the bottom using full extension hardware ball bearing side mount drawer slides. I found these on Amazon, which have been excellent quality. For my shop shelves, I purchased two Everbuilt drawer slides at Home Depot for 3x the cost that were inferior in quality.
All this would be supported by an internal frame that would allow us to adjust to all the non-level components of the room.
I like notching the pine board with my 5-1/2" Craftsman C3 19.2v Circular Saw. While an old tool, it is super light and I can use my speed square as a guide to notch out the pine quickly. I tried using my table saw with a crosscut sled, but the handheld saw was a lot easier.
For all joinery we used pocket screws and also #10 biscuts.
We laid out the frame on the floor and ensure the top frame was level, but we also should have leveled the bottom. Not leveling this created a lot of issues when we had to put in the drawers and build the outside frames.
The frame for the inside was built using lots of lap joints, held together by wood glue and pocket screws.
I don’t build my own face frames. It’s awesome to order them professionally finished. I ordered them from the cabinet door store, which I can’t recommend enough.
Shaker Cabinet Door
Wood Species:Paint Grade Maple w/ HDF Panel
Frame Width:2 1/4"
Finish ($11.97):Simply White OC-117
Door Width (in):18.75
Door Height (in):10.75
Total Area (sq. ft.):1.3997395833333
or $44.23 a face.
One big mistake of my design was failing to account for non-straight boards and my over-optimism in everything lining up. Since the purple boards below were rigid, any mismatched angle would effect two drawers. This trapped me in the middle of a highly coupled problem where adjusting one drawer would cause problems with the others. I solved this by cutting 1 inch out of the middle of each purple board so I could adjust each one independently. Lesson learned: designs should always account for reality and provide the ability to adjust.
In order to get the drawers to sit at the right height, I cut out spacers for each of the drawers before installing the sliding tracks.
Result
The end result was awesome. Lauren loves her bed and we learned a lot putting it together.
Walter Issacson’s words formed my understanding of Albert Einstein, Benjamin Franklin, Steve Jobs and Leonardo da Vinci. Given his habit of writing engaging biographies from the most well known people on the planet, I was surprised to hear that his latest book was about someone I’ve never heard of: Jennifer Doudna. This is probably both because she isn’t yet a household name, but also because biology and chemistry are fields that I’m just not familiar with.
All the more reason to love this book. First, as much as he tried to make this a Jen Doudna biography, it really was a story about the community leading biosciences today, a discussion of the core questions of bioethics, scientist’s battle against the novel coronavirus and a dual biography of Doudna and Charpentier — one American, the other French. The subtitle belies the scope of the book: “Jennifer Doudna, Gene Editing, and the Future of the Human Race.”
Issacson doesn’t abandon his previous themes: science, genius, experiment, code, thinking different, but this is his first full length book to a female subject for the first time. While some may suspect Isaacson is guided by social pressure to focus on a female subject, Jennifer Doudna is a genuine heroine for our time.
Unlike his other books, where Issacson is a fairly distant chronicler and researcher, here Issacson is on the stage, in the mix. The whole book is filled with first-person appearances. While these may demonstrate his diligence as a reporter, they definitely bring the reader into both his world, but also into the scientific conferences, labs, and discussions with experts on both sides of disputes. At one point he even facilitates an important phone call that re-establishes a friendship between Doudna and Charpentier. However, a certain clubbiness attends some of these references, as when he names the restaurants where key conversations occur and he made me aware of the stratospheric level he operates in in society. By opening the curtain on his life, Issacson highlights how he is the grand doyen of American journalism who has headed TIME magazine, CNN and the Aspen Institute, and who treads easily in the corridors of power.
Doudna and Charpentier
They are the sixth and seventh women to win the chemistry Nobel in its century-plus history. (Marie Curie was first, in 1911, followed by her daughter Irène in 1935.) The names Doudna and Charpentier had already been notably paired in 2015, when they jointly won the $3 million Breakthrough Prize in Life Sciences, and again in 2018, when they collected the coveted Kavli Prize in Norway.
This was both a tale of friendship, but also highlighted the frictionless collaboration that has been accelerated in the last year. Although Doudna and Charpentier never belonged to the same research institution, they formed a successful collaboration with each other and numerous colleagues in several countries by building on shared interests, camaraderie and competition.
We are able to get to know Doudna from her childhood, through her career, meet her competitors and collaborators, and fret with her over the future fallout of the CRISPR revolution and marvel at its positive potential.
She was inspired early on from reading “The Double Helix,” by James Watson. Though in this book Watson is the villain who becomes a projection of racism and patriarchy. Issacson highlights his snarky comments about the structural biologist Rosalind Franklin’s looks. His discussion makes me want to read Doudna’s own book, A Crack in Creation written with her former student Samuel Sternberg and published in 2017. Its subtitle, “Gene Editing and the Unthinkable Power to Control Evolution,” doesn’t understate how critical this field will be for my generation.
Doudna was raised by academic parents who encouraged her fascination with science, she flourished in college and went on to earn a doctorate in biological chemistry and molecular pharmacology from Harvard. After fellowships and postdoc programs at the University of Colorado and Yale, she joined the faculty at the University of California in 2002. In 2006, she learned about CRISPR, a system of identical repeated DNA sequences in bacteria copied from certain viruses.
Others had discovered that this was a defense mechanism—CRISPR DNA generates enzymes that chop up the DNA of the infecting virus. With collaborators, she discovered how CRISPR operates and invented a much simpler technique for cutting DNA and editing genes. Although known since the 1970s, “genetic engineering” was a complex, tedious process. CRISPR made it much simpler.
Traditional gene therapy is an insertion of a functional gene in the location of a dysfunctional gene or neighboring to it. CRISPR Cas-9 makes it possible to carry out genetic engineering on an unprecedented scale at a very low cost. How it differs from previous genetic engineering techniques is that it allows for the introduction or removal of more than one gene at a time. This makes it possible to manipulate many different genes in a cell line, plant or animal very quickly, reducing the process from taking a number of years to a matter of weeks. It is also different in that it is not species-specific, so can be used on organisms previously resistant to genetic engineering.
Doudna and Charpentier the two scientists co-authored a seminal paper in 2012 that galvanized the scientific establishment and led to a torrent of awards, culminating in the 2020 Nobel Prize in chemistry. This starts the race to apply gene editing to altering life and curing diseases, the intense debate over its morality, and the often childish quarrels over credit and patents.
Sometimes the rivalries prove fierce. Doudna and Zhang, after initially attempting to commercialize their discoveries jointly, found themselves in a fierce legal battle over intellectual property. At the heart of this dispute is the question of whether orchestrating CRISPR-Cas9 to work in human cells (Zhang’s contribution) was an essential feature of the discovery, or whether this advance was a relatively obvious and inevitable step after its efficacy had been demonstrated in a test tube (Doudna’s and Charpentier’s contribution). At stake is not only money, but also prestige and legacy.
Ethics
Isaacson devotes much anguished discussion to the ethics of gene editing, especially when it comes to “germline” changes that can be passed on through generations and “enhancements” such as green eyes or high I.Q. that prospective parents could insert into their offspring’s genomes.
Isaacson also examines the case of Chinese biophysicist He Jiankui, who in 2018 defied the norms of the international scientific establishment by using CRISPR-Cas9 to alter the human germline—producing three genetically engineered babies. He Jiankui anticipated a heroic reception of Watsonian proportions, and the Chinese media was initially supportive. Yet the backlash from the scientific community proved ferocious, and He Jiankui ultimately found himself fired from his university and imprisoned for his research. One man’s iconoclasm, it seems, is another’s grave misconduct.
Issacson uses biography to provide an introduction to the complex moral and sociological questions that stem from these advances. He explores the potential for curing scourges like Huntington’s disease and sickle cell anemia, but also the slippery slope that might lead to creating offspring that are more intelligent or athletic. In doing so, he makes eloquent and succinct work of laying out the parameters of the debate between advocates of individual liberties and of collective welfare, introducing readers to the ideas of philosophers John Rawls, Robert Nozick, and Michael Sandel. As in his past volumes, Isaacson displays his gift for making complex material enjoyable to read.
Of particular concern to Isaacson and his community are the implications of gene editing for human equality, the fear that those with plentiful resources will use these technologies to expand the gap between wealthy and indigent. (Of course, the opposite might prove true: Carefully managed, such advances could be harnessed to level the playing field between rich and poor, adding a genetic boost to those who cannot afford SAT tutors and tennis lessons.)
I deleted and recovered a large number of photos (thanks foremost). However, a large number of images from a browser cache was messing up my photo library.
Who wants to keep 10,000 of these images stored on my harddrive?
I used the number of unique colors to filter them out via MATLAB.
As expected, if I plot this, I get a nice s-curve:
plot(sort(nonzeros(ucolors)))
Or, viewing this as a histogram
histogram(nonzeros(ucolors),100)
So I modified the script to move all images with unique color counts less than 4500 unique colors to a folder: potential bad
This worked perfectly and saved my whole Saturday.
This seemed like the book to read since I got a break and wanted to get smart on virology and try to make sense of what’s happening in our world. Professionally, I’ve been deep in the world of cyber security and defence technologies but I’ve always looked over the fence what’s happening in the Pharmaceutical industry and this book was intended to be a bridge that I’ve needed to cross for sometime. In total, this book is a sweeping scientific and social history as a cautionary and instructive tale. How governments fail in the face of inexplicable nature is one of his most potent themes. Readers interested in science, social science, the social fabric and especially those compelled by dealing with the 2020 coronavirus pandemic, may be up for the challenge.
For me, this book was a long slog to get through at 555 pages that combined history, science, and some biographies of the folks that made modern medicine possible. This book gave me far more than I ever wanted to know about the Great Influenza Epidemic of 1918-19. It begins in September of 1876 with the founding of the Johns Hopkins University, with its emphasis on medical research against the backdrop of a terribly poor state of medical science in the US. It continues with the difficulty in getting doctors and educators to believe that there was a place for research in medicine at all. I kept waiting for the plague to begin and, sure enough, chapter 14 begins with the news that in February of 1918 someone from Haskell County Kansas most likely carried the disease to Camp Funston, a U.S. Army training camp located on Fort Riley, southwest of Manhattan, Kansas. It goes on to tell in great detail the difficulty of convincing the army, or most anyone in power, that it was killing people, even as it was doing exactly that.
The Great Influenza was written by John Barry, a distinguished scholar, historian and adjunct faculty member at Tulane University. Among his other well-known works are Rising Ride, about a devastating 1927 Mississippi flood. His book, Roger Williams and The Creation of the American Soul, concerns one’s American lasting influence, especially in the United States’ unprecedented insistence on the separation of church and state. This may of explained why he so eagerly (and annoyingly) constrasted science against faith in the first several chapters of the book.
He clearly is fascinated with how events shape the US national fabric, as seen also in his Power Plays: Politics, Football, and Other Blood Sports and The Ambition and the Power: The Fall of Jim Wright: A True Story of Washington. For Barry – who wrote this book well before the 2020 coronavirus pandemic – the 1918 influenza outbreak has a recurring theme: the consistent lying, obfuscation and incompetence of American officials, notably how they refused to alert the citizenry they were pledged to protect about the dangers they faced. Overall, he presses three major themes: (1) be honest with the public, (2) honor the heros on the front lines of research and (3) people in power should be held to account.
The 1918-1919 influenza pandemic swept the world. From its early start in the midwest US, through its subsequent spread through troop movements during World War I, the influenza virus killed approximately 50 to 100 million people (compared with the 2M deaths I forecast for the novel coronavirus). The sheer destruction of 1918-1919 influenza pandemic is difficult to grasp: it killed an estimated 5% of the world’s population – 50 million to 100 million people, about 675,000 people in the United States. Government officials, in stark parallel to 2020’s coronavirus pandemic, dismissed the outbreak or lied about it.
One of the most shocking parts of this world is how unprepared we were to understand disease then. No treatment then available could stop the rapidly mutating virus. While we have mRNA vaccines at crazy speeds (thanks DARPA), there are still uncanny parallels to today and harkens to deadly lessons apparently still unlearned.
Barry traces the flu to its source. The pandemic started in 1918 when men from Haskell County, Kansas trained at a US Army base, Camp Funston, where a cook reported ill with influenza on March 4, 1918. More than 1,100 soldiers entered hospitals and 38 died. Then the Army transferred soldiers from Funston to US bases and to Europe. Barry lays out the virus’s path. It traveled with the soldiers, moving through North America, Europe, South America, Africa, Asia and scattered Pacific islands. I was ashamed by the feeling that this was the "American Influenza" in the same sense the Trump admistration wanted to blame the Novel Coronovirus on China.
Viruses Only Replicate
One area of Barry’s science reporting is particularly compelling: his primer on influenza viruses. He explains that they originated in “wild aquatic birds.” Exposure to an avian virus can infect people, but, he underscores, people can’t infect people unless the virus mutates to adapt to person-to-person transmission. Which it has; the US Centers for Disease Control says influenza now kills 3,000 to 56,000 Americans a year.
Influenza is a viral disease. When it kills, it usually does so in one of two ways: either quickly and directly with a violent viral pneumonia so damaging it has been compared to burning the lungs; or more slowly and indirectly by stripping the body of defenses…
Barry offers a lot of food for thought in one simple idea: replication is a virus’s only function. The influenza virus hides from the immune system by “entering” a cell, but not “fusing” with it, as other viruses do. About 10 hours after an influenza virus attaches to a cell, the cell releases a “swarm” of 100,000 to one million influenza viruses. Barry successfully conveys the horror of this invasion.
Many viruses, fungi and bacteria infect the lungs. The most ubiquitous is the pneumococcus, which can initiate or aggravate lung infections. Barry explores medical history prior to 1918 flu outbreak as a context for medicine’s utter helplessness. Scientists failed to develop a serum against pneumococcus in 1892, despite medical advances against tetanus, meningitis, diphtheria and typhoid. Barry tells how desperate doctors tried fighting the flu with the vaccine for typhoid and with quinine, a malaria treatment.
Barry’s depiction of experts’ inability to understand the influenza virus provides a stark reminder of the mystery of the 2020 coronavirus pandemic. He makes the danger of the 1918 plague plain when he writes that face masks were no protection against it. People’s only hope was to avoid exposure, but no one, he explains, understood quite how to do that.
However, Barry reserves his harshest criticism for leaders in the media or government whose ill fated decisions were a disaster for the public. Barry reports that the 1918 virus struck in waves. The spring wave killed relatively few; the second wave was more destructive. And the deliberate dishonesty of officials was deadly indeed.
The pandemic ravaged Philadelphia. Barry regards its municipal public health director, Wilmer Krusen, with well-deserved contempt. When locals planned a Liberty Loan parade to promote war bonds, he advised the public to “avoid crowds,” but allowed the parade to go on. Barry states his belief, here as in his other works, that officials must take responsibility for the people under their charge. He regards failure to do as a high moral crime.
On October 1, 1918 the virus killed 117 people in Philadelphia; the 31 local hospitals were full. Daily influenza deaths soared from 254 on October 5 to 428 on October 8. Death overwhelmed funeral homes and the morgue. Barry paints a vivid picture of dead bodies in homes, on porches and in yards.
Barry cites Royal Copeland – municipal health commissioner of New York City when influenza killed its first victim there on September 15 – as another failed official. As patients poured into hospitals, Copeland dismissed the illnesses as just one among “other bronchial diseases.” The virus killed 33,000 New Yorkers. The plague ravaged New York, and then New Orleans, Louisville, Pittsburgh and Baltimore. It hit Portugal and Greece and, by summer, death tolls rose in England, Scotland and Wales.
The Red Cross recruited nurses to work in American cities but prioritized providing the military with nurses. Soldiers died on transport ships in such numbers that the vessels became "floating caskets".
President Wilson’s Flu
Most flu victims were in their 20s. Barry reveals that their immune response to the virus filled their lungs with “fluid and debris.” The elderly demonstrated immunity worldwide, probably because they’d been exposed to an earlier, milder pandemic. Linking, as ever, the past to the present, Barry notes that the 1918 pandemic caused a disintegration of the lungs that health experts now call acute respiratory distress syndrome (ARDS).
Barry is stark (and maybe wrong) about how the influenza outbreak changed history. The disease damaged the nervous system and brain and mentally destabilized victims. Barry depicts President Woodrow Wilson’s trip to Paris in 1919, when he developed a cough, diarrhea, a 103-degree fever – influenza symptoms. Wilson negotiated during his illness, but Barry finds that the president made multiple shocking concessions he had resisted days earlier. Barry presents Wilson as much weakened and disoriented from the flu. Wilson suffered a stroke four months after signing the Paris peace treaty, which treated Germany harshly and set the stage for Adolf Hitler’s rise to power. Barry links this stroke to Wilson’s earlier viral illness.
People who survived exposure to the 1918 influenza developed greater immunity as the virus mutated to a less-lethal form. Barry found that the further along in the epidemic the outbreak hit a US city, the lower its mortality rate. The 1918 virus faded away in the early 1920s.
Heros
The author cites scientists with links to Johns Hopkins, the Rockefeller Institute, Harvard and the University of Pennsylvania as foremost in battling the virus. He treats their efforts as a tale of suspense, but that isn’t always as convincing as his depiction of the disease and its effects.
The accepted cause of influenza in 1918 was a bacillus known as B. influenzae. While thought to be the source of infection at the time, it is now known to be a cause of secondary infections, not the influenza itself (which is viral). The combination of an elusive pathogen and a bunch of secondary invaders masquerading as the culprit stymied researchers at the time and kept them busy for decades afterwards.
Barry’s focus is almost entirely on the United States and largely on American researchers. Here, in his efforts to carve individual human dramas from the great mass of the pandemic, he often loses the thread. In order to explain the nature of medical research in America, he centers on the post-Civil-War experiences of William Welch, the driving force behind the creation of the Johns Hopkins medical research labs. We expect Welch to become a leading figure in the battle against the influenza, but all Welch did in 1918 was get sick and then get better, sidelining him for the duration of the epidemic, whereupon he disappears from Barry’s story.
Ultimately, Barry has two heroes: Oswald Avery and Paul Lewis. Both became nearly obsessed with research on the influenza pathogen. Neither solved many of its mysteries. Avery digressed into a completely different line of work that led to his discovery that DNA plays the key role in genetics. Lewis became disheartened, and his research career dwindled after a brilliant start; he ended up sacrificing his own life in an attempt many years later to fight a yellow-fever outbreak in Brazil.
Highest praise is reserved for the luminaries of the medical research field — William Welch, Oswald Avery, Simon Flexner and others — who toiled tirelessly to combat the disease. Amid Barry’s thorough biographical snapshots of these men — a veritable Who’s Who of the history of modern medicine — one man stands apart as the story’s fallen hero: Paul Lewis.
In the early 1900s, Lewis, then a scientist at the Rockefeller Institute, not only proved that a virus caused polio but also developed a vaccine that protected monkeys from the disease. Turning his focus to the flu epidemic, Lewis successfully identified the disease as influenza and committed himself to developing a vaccine. But as Barry acknowledges, the greatest challenge for Lewis and his colleagues was not the research they undertook during the epidemic, but rather the accounting that came afterward, when they were left to "sift through the detritus of their failures for clues to success." Describing that process, Barry speculates that medicine’s psychic burdens may ultimately have been more than Lewis could bear, and that his death from yellow fever, contracted in a laboratory accident, was actually a suicide.